Once you install Yosemite, the file will automatically erase itself, so it's important to make a bootable drive first. If you want to install first and then make a bootable drive, make a copy of the installer app in another location so you can access it later. Worst case scenario is downloading the large file again from the Mac App Store, but then why make a bootable drive? The Easiest Way: Use DiskMaker X By far the easiest way to create a bootable drive is to use the DiskMaker X application, which automates the entire process in the next method. To start out, download the newest version of DiskMaker X from. Currently, that's the.
Photo editing montor for mac pro. Max out the ram on whatever machine you are editing on.
Oct 1, 2015 - Luckily, DiskMaker X helps fill the void by allowing you to make a bootable OS X 10.11 El Capitan USB install drive, making a task such as. Step 7: Drag and drop the USB disk into the Terminal window. Step 8: Type --applicationpath in the Terminal followed by a space. Step 9: Open Finder → Applications and drag and drop the Install OS X El Capitan GM Candidate.app to the Terminal. Step 10: Press Return on your keyboard while inside the Terminal.
(Update: the public Yosemite version is out now, and you can download it from,, or.) Once download, open it up and select 'Yosemite Beta' or 'Yosemite 10.10' (depending on the version you're using) to start the process. Then just follow the rest of the prompts to start the disk-making process. It could take anywhere from 15 minutes to to 45 minutes to finish, depending on your USB flash drive.
If it's more toward the latter, you might get a ' error, but it should still work, (it worked for me). The Less Easy Way: Format & Use Terminal If you're more comfortable with Terminal commands, this is the method for you. Just make sure your USB drive is already formatted correctly before proceeding.
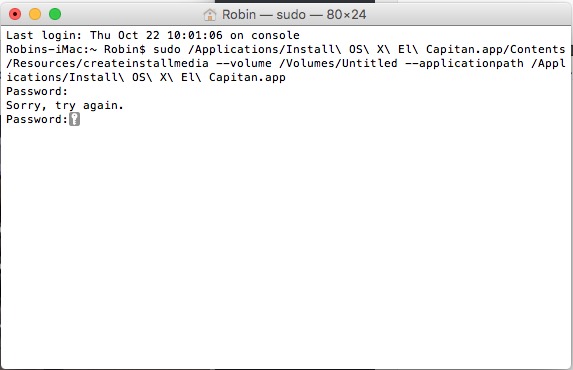
To see how to correctly format your USB drive, please see Step #1 below in the 'The Hardest Way' section. With your USB drive ready to go, open up Terminal and type (or copy/paste) the following command.
• sudo /Applications/Install OS X Yosemite.app/Contents/Resources/createinstallmedia --volume /Volumes/Yosemite --applicationpath /Applications/Install OS X Yosemite.app --nointeraction Note that you should replace the 'Yosemite' in 'Volumes/Yosemite' with whatever you named your USB drive. This should all be one line.
How to download font for microsoft word. For example, use the Slide Master to dictate that all of the slide sub-heads will appear in your new font. By changing the font formatting in one place, it translates over to all the slides in the deck.
After you get it in there, just hit the Enter key. Type in your admin password to continue and the Enter again. (You won't visibly see your password typing, but it's happening—believe me.) Now just wait.
This could be fairly quickly or very long, depending on your system and USB drive. The Hardest Way: Do Everything Manually If you don't want to use DiskMaker X or Terminal commands, this is another option for you. It's a lot more complicated, but gets the job done. Step 1: Reformat Your USB Drive First, make sure you have a USB flash drive that's at least 8 GBs in size, then mount it.
Open up Disk Utility and do the following. • Select the USB drive (not the partition) • Go to the Partition tab • Change the 'Partition Layout' to 1 Partition • Rename it Yosemite (or whatever you want) • Select Mac OS Extended (Journaled) as the 'Format' • Click the Options. After your Finder reloads, the hidden files you once saw before should now be gone. Go ahead and close all of your windows, exit Terminal and Disk Utility, and eject your mounted disks to clean up your mess. Installing Yosemite on Your Computer Now, it's time to test out your new drive. Restart your computer while holding the Option (Alt) key on your keyboard.
Wait until the Startup Manager pops up, then select your new OS X Base System volume (or whatever your bootable drive is called). Alternatively, you can just hold down the C button while starting up to boot directly into the USB drive. Troubleshooting Tips If the installation of Yosemite freezes, it's probably because your USB drive is corrupted in some way. This happened to me on the first couple tries, where it would freeze at 5 minutes left. The third USB stick I used was successful, and it took less than 15 minutes for Yosemite to boot up.
If you're getting an Undefined error: 0 warning when trying to install, this more than likely means that you forgot to perform Step 6 above, so make sure to copy over those two BaseSystem files. If you got the 'AppleEvent timed out' error using DiskMaker X, more than likely it'll still work. Just eject the new drive and use it. If it doesn't work, try one of the other methods out to start over.