Dec 10, 2015 - The up and down arrow keys scroll one row up and down, and the right and left. Mac Excel 2011 doesn't show scroll lock status anywhere.
Music transfer for samsung s6 active for mac. Anytime you have column headers on your spreadsheet it is a good idea to make them visible at all times. This helps you clearly see what the column is representing without having to memorize the headers. There are no reasons to not use this trick, so here we go! Select the row immediately under the row you want to freeze at the top.
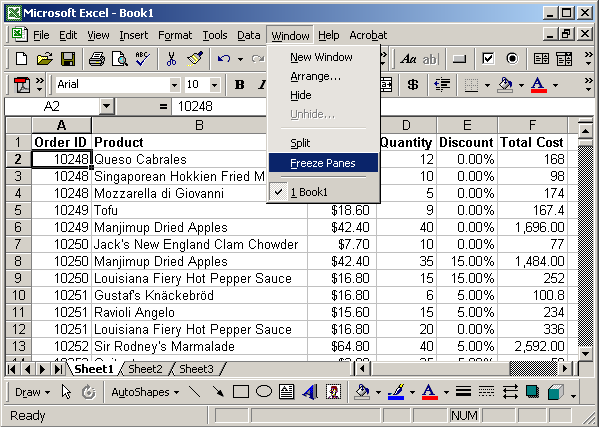
For example if you have row 1 filled in with the headers, select row 2. Now click on the Window menu bar at the top of your screen: And select the Freeze Panes option Excel will place a bold line under the frozen column headers. These headers now go everywhere with you until you go back to the Window menu and click on Unfreeze Panes. Notice Row 1 and Row 2 in the screenshot. Now I will scroll down to Row 777 and we will find Row 1 right above it. And there you have it! Now your column headers can follow you wherever you may travel on your spreadsheet.
For any questions or comments feel free to email me directly at George@ExcelSkin.com.
When printing in Excel, it is sometimes useful to print a set of rows (e.g. Column headings) on each page in the print out. There is nothing worse than having a printout that runs to multiple pages, with the column headings only printed on the first page. This lesson shows you how to get header rows printing at the top of every page in Microsoft Excel 2011 for Mac. You will also learn how to print header columns on the left of every page in your printout.
The concepts are the same, but the steps are slightly different. Choose the rows you want to print on each page • Start by opening the spreadsheet you want to print. • In the ribbon menu, choose Layout.
The ribbon will change to the Page Layout ribbon bar: • In the Page Setup section, click the Repeat Titles button: • The Page Setup dialog box will be displayed. If you're used to using the PC version of Excel, this will look familiar but different: • Click in the box next to Rows to repeat at top. • If you want to print one or more columns to the left side of your print out, you could also follow the instructions below to print one or more columns to the left of each page. • Note there is also an option here to print Row and column headings. This does something different to what this lesson covers.
In QuickBooks for Mac, open the company file that you would like to convert to a Windows file. Choose whichever is most relevant File > Save File for Accountant; File > Export > To QuickBooks for Windows. Follow the on screen instructions. QuickBooks will then create a.qbb file. You can then click “Show File in Finder” to locate the file. Quickbooks windows to mac conversion.
It will print the Excel column and row references (i.e. A,B,C; 1,2,3). • At this point you will choose which rows should repeat at the top. You have three options: • Type the rows you want to repeat. For example, if you want the first 4 rows to repeat, type $1:$4.
• Click the selection box at the end of the box. The Page Setup dialog box will shrink down to just one line. You can then select the rows you want from the spreadsheet you have open. • Just click in the spreadsheet and select the rows you want from the spreadsheet (assuming you can see the rows you want to select). • The last two options are essentially the same, but the last option is slightly quicker. • Either way, Excel will record your selection as shown below.